
Docker Architecture
- Refer Here for the Docker internals.
- Overtime, the Docker daemon became problematic as Docker Daemon was a huge monolith.
- Docker had to refactor the Docker Daemon and at the same time OCI initiative had started.
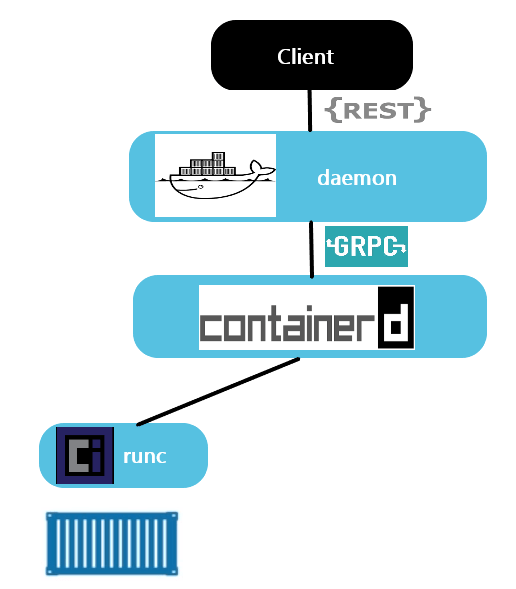
- The basic idea of new Docker was to implement as shown below

- The actual implementation looks as shown below

Docker Image Creation using Dockerfile
Activity 1: Create a Image which hosts html page on apache server
- Manual Steps:
- Install apache
- Create a html page with following content in /var/www/html/index.html
html

  <html>

      <head>

      </head>

      <body style="background-color:powderblue;">

          <h1>This is my static web page</h1>

      </body>

</html> - Image creation approach:
- Option 1:
- Take alpine/ubuntu as base image
- Install apache server
- Copy the html page in /var/www/html/index.html
- Option 2:
- Take a base image with apache already installed
- Copy the html page in /var/www/html/index.html
- I would go with Option2 as it is easier and maintable
- Base image => any image with httpd/apache2 pre installed.
- In option2 as discussed in class lets go with image
httpd:alpine3.15. In this image the html pages are present @/usr/local/apache2/htdocs/index.html - Let me try to write a Dockerfile for this. Create a new folder and a file with name
Dockerfilein it. - Dockerfile is set of instructions in the form of
<INSTRUCTION> <VALUE>Refer Here for the dockerfile reference - To select a base image instruction is FROM Refer Here
- To copy the index.html into the container which is used to create docker image we use COPY instructions Refer Here
- To specify the Port on which our application can be accessed use EXPOSE instruction Refer Here
- Thats it we have a Dockerfile which we can use to build image. Refer Here for the changes done
- Lets build a docker image from Dockerfile. Ensure you have folder with your Dockerfile
docker image build -t <nameofimage>:<tag> <folder-where-dockerfile-is>

* Now lets create a container from our image activity1:1.0
docker container run -d -P --name act1_1 activity1:1.0


* Now lets make some changes in html file to build the activity:1.1 image Refer Here for the changes done


*